This guide will show you how to integrate Google Calendar into your Rails application using the google-api-client gem, the Google Calendar API, and Google’s OAuth 2.0 flow for web applications. You’ll need a working Ruby 2.0 environment; a Rails application (either Rails 4 or Rails 5); and a Google account.
Creating a new project
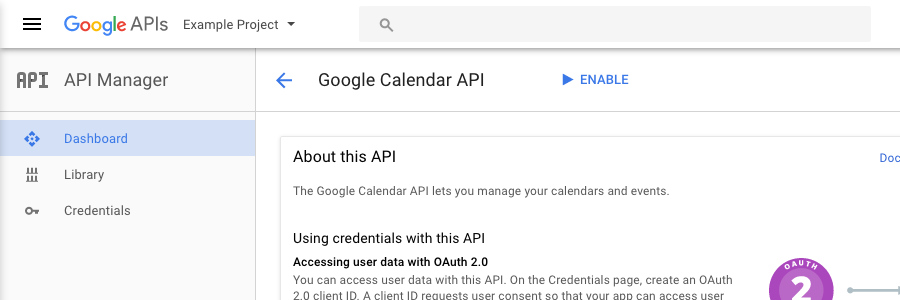
Sign in to the Google API Console and create a new project for your application. Then enable the Google Calendar API for your project—search for the Google Calendar API on the Library page and then click the ENABLE button on the API view.
Configuring the OAuth consent screen
Next: set the name of your application on the "OAuth consent screen" tab.
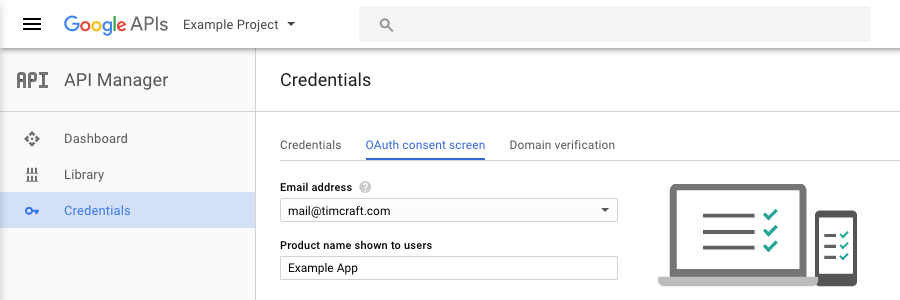
The OAuth consent screen is what your users will see when they authenticate with Google and agree to their data being shared with your application. For development just put in the name of your application, you can easily change it later.
Creating client credentials
Next: create a set of OAuth 2.0 credentials for your application.
From the "Credentials" tab click the "Create credentials" button; select the "OAuth client ID" option; and then select "Web application" for the application type. This will give you a Client ID and a Client secret which you’ll use in your application to access the API.
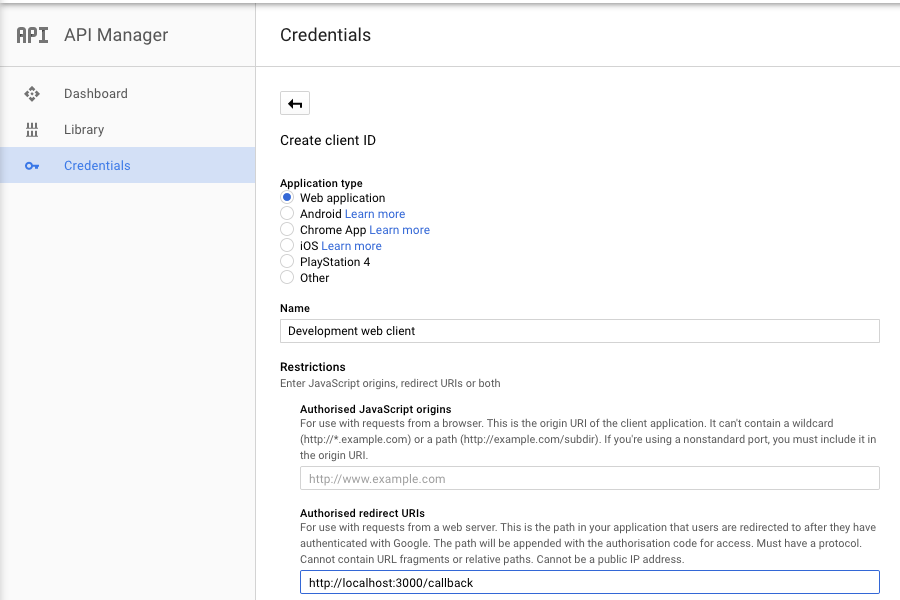
You also need to add a redirect URI to the list of "Authorised redirect URIs". This is the route in your application that Google redirects back to after a user grants access. For development it should be something like http://localhost:3000/callback, depending on what port your development web server is running on and what path you want to use for the callback.
Storing your client credentials
Next: copy the Client ID and Client secret into your application.
development:
  secret_key_base: super_long_secret_key_for_development
  google_client_id: YOUR_GOOGLE_CLIENT_ID
  google_client_secret: YOUR_GOOGLE_CLIENT_SECRET
As with any API credentials these values should be kept secret, so a good place to put them is your application’s config/secrets.yml file.
Alternatively you could store the credentials in environment variables.
Installing the google-api-client gem
Next: add the google-api-client gem to your Gemfile:
gem 'google-api-client', require: 'google/apis/calendar_v3'Then run bundle to install the gems. The google-api-client gem has a lot of dependencies, but will save you from having to write any low level HTTP code.
Now that your application is configured you can implement the OAuth 2.0 flow.
Authorizing access to Google Calendar
The first step in the OAuth 2.0 flow is to redirect the user to Google so they can sign in and consent to the access you are requesting. For example:
class ExampleController < ApplicationController
  def redirect
    client = Signet::OAuth2::Client.new(client_options)

    redirect_to client.authorization_uri.to_s
  end

  private

  def client_options
    {
      client_id: Rails.application.secrets.google_client_id,
      client_secret: Rails.application.secrets.google_client_secret,
      authorization_uri: 'https://accounts.google.com/o/oauth2/auth',
      token_credential_uri: 'https://accounts.google.com/o/oauth2/token',
      scope: Google::Apis::CalendarV3::AUTH_CALENDAR,
      redirect_uri: callback_url
    }
  end
end
Signet is the underlying implementation of OAuth 2.0 that the google-api-client gem uses. The client #authorization_uri method does the work of constructing the Google authorization URI with the correct parameters, you just need to convert it to a string.
The client options are shown here extracted into a private method in order to share them between actions and avoid repetition. The client_id and client_secret parameters correspond to the secrets you copied into your secrets file; the authorization_uri parameter is Google’s OAuth 2.0 authorization endpoint; the token_credential_uri parameter is Google’s OAuth 2.0 token endpoint; the scope parameter determines the level of API access that your application is asking for; and the redirect_uri parameter is the route in your application that Google will redirect back to.
The AUTH_CALENDAR scope gives you read+write access. If your application only needs read access you should instead use the AUTH_CALENDAR_READONLY scope.
Testing the authorization redirect
In order to make the redirect work you’ll need to add a couple of routes to config/routes.rb. One for the redirect action and one for the callback action:
get '/redirect', to: 'example#redirect', as: 'redirect'
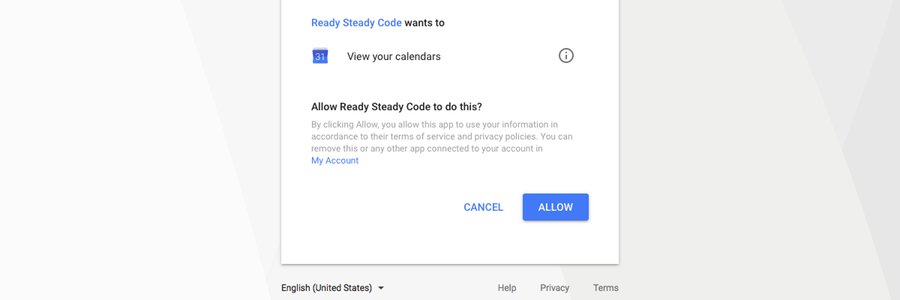
get '/callback', to: 'example#callback', as: 'callback'You can then test the authorization redirect by running your application and hitting the redirect action. If everything is configured correctly you should see the Google consent screen requesting access to view your calendars.
If you allow access then you’ll be redirected back to the callback action with a temporary authorization code. If you see a Google branded redirect_uri_mismatch error then double check the URI you added to "Authorised redirect URIs" is the same as the callback URI that your application is generating (callback_url in the above example).
Fetching an access token
The next step in the OAuth 2.0 flow is to handle the callback and exchange the temporary authorization code for an access token. Here’s an example controller action:
class ExampleController < ApplicationController
  def callback
    client = Signet::OAuth2::Client.new(client_options)
    client.code = params[:code]

    response = client.fetch_access_token!

    session[:authorization] = response

    redirect_to calendars_url
  end
end
To make this work you’ll also need to add another route for the calendars action:
get '/calendars', to: 'example#calendars', as: 'calendars'Initialization of the client object is similar to before. The code parameter is the temporary authorization code which comes from the query params.
The #fetch_access_token! method does exactly what it says, exchanging the temporary authorization code for an access token. The response is a hash containing the access token together with a refresh token (which we’ll need later), and a couple of other token parameters. For simplicity we store all of the response parameters in the session, and redirect to a calendars action which we’ll implement next.
Fetching a list of calendars
Now we have an access token we can call the Google Calendar API itself—finally!
The callback action in the previous step finishes by redirecting to a calendars action, which can be implemented something like this:
class ExampleController < ApplicationController
  def calendars
    client = Signet::OAuth2::Client.new(client_options)
    client.update!(session[:authorization])

    service = Google::Apis::CalendarV3::CalendarService.new
    service.authorization = client

    @calendar_list = service.list_calendar_lists
  end
end
This time the client object is updated with the access token and other token parameters stored in the session. The CalendarService object provides the methods for calling the Google Calendar API. The service #list_calendar_lists method fetches the authorized user’s list of calendars, which can be displayed with a basic view like this:
<ul>
  <% @calendar_list.items.each do |calendar| %>
    <li><%= calendar.summary %> (<%= calendar.id %>)</li>
  <% end %>
</ul>
Now that we have the calendar identifiers we can fetch the events.
Fetching calendar events
Loading a list of events can be implemented similarly to the calendars:
class ExampleController < ApplicationController
  def events
    client = Signet::OAuth2::Client.new(client_options)
    client.update!(session[:authorization])

    service = Google::Apis::CalendarV3::CalendarService.new
    service.authorization = client

    @event_list = service.list_events(params[:calendar_id])
  end
end
Call the service #list_events method with a calendar identifier to fetch a list of events for that calendar, and display the events with a basic view like this:
<ul>
  <% @event_list.items.each do |event| %>
    <li><%= event.summary %> (<%= event.id %>)</li>
  <% end %>
</ul>
In this example the calendar identifier comes from the route params, so to hook everything up you need to add another route like this:
get '/events/:calendar_id', to: 'example#events', as: 'events', calendar_id: /[^\/]+/Note that calendar identifiers can contain dots and by default Rails interprets dots as the start of the format parameter, so you’ll need to use segment constraints to specify calendar identifiers in any of your application URLs.
Adding an event
So far we’ve just been reading data from the API, what if you also need to add events to Google Calendar? Here’s an example using the #insert_event method to add an event:
class ExampleController < ApplicationController
  def new_event
    client = Signet::OAuth2::Client.new(client_options)
    client.update!(session[:authorization])

    service = Google::Apis::CalendarV3::CalendarService.new
    service.authorization = client

    today = Date.today

    event = Google::Apis::CalendarV3::Event.new({
      start: Google::Apis::CalendarV3::EventDateTime.new(date: today),
      end: Google::Apis::CalendarV3::EventDateTime.new(date: today + 1),
      summary: 'New event!'
    })

    service.insert_event(params[:calendar_id], event)

    redirect_to events_url(calendar_id: params[:calendar_id])
  end
end
The method arguments are the id of the calendar to add the event to, and a Google::Apis::CalendarV3::Event object representing the event. The start attribute specifies the start date of the event; the end attribute specifies the end date of the event; and the summary attribute specifies the title of the event.
You can hook this action up by adding a post route to your routes file:
post '/events/:calendar_id', to: 'example#new_event', as: 'new_event', calendar_id: /[^\/]+/And a button on the list of events to trigger the action:
<%= form_tag new_event_url do %>
  <%= submit_tag 'Add event' %>
<% end %>
Sign up below for a cheat sheet which includes all the attributes of the Google::Apis::CalendarV3::Event attributes for easy reference!
Refreshing the access token
Google’s access tokens are typically only valid for an hour, after which they need to be renewed—this is what the refresh token that was returned with the access token is for.
Calling a CalendarService method with an expired access token will raise a Google::Apis::AuthorizationError exception. Rescue from that exception and call the #refresh! method on the Signet client to refresh the access token.
For example, here’s the calendars action from before, with logic added for rescuing the authorization error and refreshing the access token:
class ExampleController < ApplicationController
  def calendars
    client = Signet::OAuth2::Client.new(client_options)
    client.update!(session[:authorization])

    service = Google::Apis::CalendarV3::CalendarService.new
    service.authorization = client

    @calendar_list = service.list_calendar_lists
  rescue Google::Apis::AuthorizationError
    response = client.refresh!

    session[:authorization] = session[:authorization].merge(response)

    retry
  end
end
The response from the client #refresh! method is similar to the response from the #fetch_access_token! method, except that it won’t include the refresh token. The existing authorization hash is therefore merged with the new authorization hash so that the refresh token isn’t lost, and Ruby’s retry keyword is used to retry the request.
The end—or the beginning?
There are plenty of opportunities for refactoring depending on how you structure your application, but if you’ve followed the steps above you should have a working Google Calendar integration which can list calendars, list events, and add new events.
Read through the Google Calendar API Reference for more details on the API.
Sign up below for a Google Calendar API cheat sheet which lists the various service API methods and model attributes for calendar and event data.